
Welcome to ExtremeHW
Welcome to ExtremeHW, register to take part in our community, don't worry this is a simple FREE process that requires minimal information for you to signup.
Registered users can:
- Start new topics and reply to others.
- Show off your PC using our Rig Creator feature.
- Subscribe to topics and forums to get updates.
- Get your own profile page to customize.
- Send personal messages to other members.
- Take advantage of site exclusive features.
- Upgrade to Premium to unlock additional sites features.

Steven
-
Posts
42 -
Joined
-
Last visited
-
Days Won
4 -
Feedback
0%
Content Type
Forums
Store
Events
Gallery
Profiles
Videos
Marketplace
Tutorials
Everything posted by Steven
-
[Sponsored] AMD ThreadRipper 3960X Aorus Build by Duality92
Steven replied to Duality92's topic in Sponsored Builds
damn son -
AMD Ryzen 3 3300X Single Core Cinebench 15 Score Leaks
Steven replied to Andrew's topic in Rumour Mill
Now is a great time for me to score more Z170/Z270 motherboards cheap to mod for Z370. -
This is the type of mod I like.
-
You can add me
-
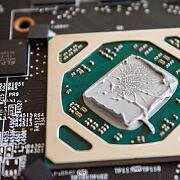
So let's first discuss on how one would need to proceed to achieve this mod. Firstly, you need a motherboard with Z170 or Z270 chipsets, these are the high end mainstream models from Intel for 6th and 7th generation Core series processors. This mod can be done on lower end chipsets also using likely a similar method (or even the same), but personally, I don't see the advantage of using lower end processors for such a mod (apart from maybe i7 8700 on H110 or H170?). Regardless, I was able to source a Z170 higher end motherboard with EKWB monoblock for $95 USD. For a new board that would be twice the price for just the motherboard, add another $175 for a monoblock, you're almost at 4x the price. So, enough digressing, to do this, you also need to get a 8th gen or 9th gen CPU. This will be your end result chip, I choose to buy a used 8700K (I was looking for a 8700K or 9700K, and got a great deal on a 8700K). You also need a 6th or 7th gen CPU to physically do this mod, as you need to mod the original BIOS, I got my hands on a kaby lake G3930 celeron, you can find these quite cheaply as a lot of miners are offloading their rigs were using these $40ish chips. Luckily for me, this mod isn't new or half baked. A lot of resources exist to achieve this mod and specialized software tools have been create to help do all the tedious BIOS modding. In regards to modding the CPU, well, you've got a few eBay sellers selling the stickers you need to isolate pins on the CPU to trick the motherboard and/or CPU. Fellow editor @mllrkllr88 had sent me a link to this eBay listing specifically. I didn't want to wait for these stickers and figured I could cut them myself, so I saved the images on my PC and use paint to convert them to black and white to be able to use the image files to cut them out myself on my Cricut vinyl cutter machine, took quite a bit of trial and error to get the sizing just right. Once I dialed in the size with just regular vinyl, I proceeded to apply two layers or Kapton tape over the paper backing from vinyl to cut on my machine, just like vinyl. Two tries later (to get the right cutting pressure) and I got what seemed to be two perfectly fitting stickers! Some motherboards require two pins to be also shorted, but luckily for me, the Gigabyte motherboards don't, so all I needed was stickers. With the i7 8700K CPU modded. The next step was to mod the BIOS. The BIOS needed to be modded for quite a few obvious reasons, but some aren't quite as obvious. 6th and 7th generation chips were only designed to go up to 8 threads, so firstly one of the modifications done is to bring the max thread count to 16 (in case you'd want to use a 9900K). There's a modification you need to do to enable the PCIE lanes to work, because 6th and 7th gen aren't quite configured exactly like 8th and 9th generation, so a modification in BIOS is required for this to reconfigure. You need to also fix hyperthreading, since there's also a compatibility issue because of this, might be in relation to total thread count. Now you need to insert the microcode for the new batch of CPUs, because obviously any publicly available official profile won't be supporting these. Luckily for anyone wanting to do this, there's a forum called https://www.win-raid.com/ which's core is deeper firmware level modding (BIOS's, drivers, firmwares, etc.). This thread is mainly for BIOS modding for the mod I was aiming to do exactly, but as one would guess, it isn't as straight forward as plug and play (like a USB device). My motherboard was on the latest BIOS already (BIOSes for my product) f22m, but basically I could update anything between latest and f20, which allows for multiple BIOS possibilities. I used F21 BIOS at the end because more recent version changed things I was going to mod anyways. So with the tools available, you just extract the zipped folder using the downloaded software in the OP and follow the instructions (basically take your BIOS file and drop it on the AllInOne.exe found within the zipped file). You then only get one option, which is to select which microcode to inject by selecting the CPU you're going to be using. After that, it's all done by itself. I had to put the files on my root directory or I would get errors, they say so in the thread and it was applicable for me. (Note, you'll see I modded f22m BIOS in the pictures, but I ended up using f21 for the reasons I mentioned earlier) Now, the trickiest part for me is coming up. With the BIOS modded and CPU modded, all that was left essentially was to flash the BIOS. Simple task right? Not. Here's my super setup with the Celeron for flashing the modded BIOS. There's a thread created specifically at Win-Raid for flashing Gigabyte BIOSes because often you get "Invalid BIOS image". I first tried exactly the method listed in post #5, which is downloading FreeDOS, rufus to make a bootable USB with FreeDOS and the modded EFIFlash utility. This failed, in every single combination possible for hours and hours. version 6.2, 6.5, modded 6.2 and modded 6.5. Every single combination of these with FreeDOS, various USB stickers yielded errors, which prevented EFIFlash for actually being usable, so I couldn't flash my modded BIOS. On a rested head, I created a second test setup the second night. I figured I tried every single possibility with what I had the day before so I figured I had to do something new. Instead of using FreeDOS, I looked for an alternative, I downloaded UBCD (Ultimate boot CD) to get that same command line feature to execute, from command line, the software. This ended up not working either. So having my USB formatted under UBCD now, I kept it and looked for a new EFIFlash, something more recent and found a modded version 8.0, where? On the same forum! Equipped with the new command line software, modded BIOS and new modded EFIFlash, I, ..., I'll continue in a next post!
-
So everythings done, will be writting the juicy details soooooooooooon! Intel Core i7 8700K @ 5200 MHz - CPU-Z VALIDATOR
-
In laymens terms, what does this bring me over a regular router setup?
-
I could make a 3960X (TR, not the i7) 24-core, 64GB pfsense? ALL DA TAFFIC
-
Toshiba 39L1350U for the TV. JVC SXPW650V.2 for the sub and it's actually 80W
-
My living room consists of a PC with an i5 4590S with a Silverstone AR11 and custom intake shroud with ASUS Turbo 1070Ti in a Alienware x51 with Logitech K400+ and Nixeus Revel for gaming, Toshiba 39" 1080p TV from 2012 (surprisingly good as a monitor), Simple Audio Listen (RIP) with a 40W JVC sub. I'm really happy with this setup as is. If I'm too lazy to go downstairs to game on my big TV, I just popup a folding table, slap a mouse mat for my Revel and voila, games at 1080p like a beast The speaker setup just as is (The Simple Audio Listen) is really good as PC speakers, the Bass is good if you have them against a wall, but because of the size, it won't fill a room. That's why I added a 40W JVC sub for the living room.
-
Used 8700K 'til I find a 9700K to use for the Z170 convertion I'll be attempting (thanks Reddit CanadianHardwareSwap!!)
-
Recorded on Sundays in Discord at 19:00/7pm EST. It's not available live just yet, but I'm sure that can change soon. Maybe even this week. It's up to Alex and also depends on everyones schedules. We have missed a couple of weeks because most of us couldn't turn up. Alright, I loved listening to you guys on OCN and participating in TS chat lol
-
When is this podcast anyways? Is it live?
-
I've been wanting to build myself a pfsense rig for so long now, maybe one day I'll actually do it
-
I'm missing a few parts of hardware, then I can start listing what I need for this. I got my 8700K today, I'm waiting for my "flashing" chip and I need to make my stickers!
-
Hey guys, today I bring you the start of an experiment I've been wanting to do for quite some time. This is entirely new for me, but I'm hoping my log can give people future insight! Are you guys ready for an adventure?! I sure am! Let's have a little discussion about what this mod is. Basically, Z170 and Z270 (Skylake and Kabylake) are only able to support those two generations (6th and 7th gen). Now, the thing is, the socket is physically the same between these and 8th and 9th gen, which is considered as LGA 1151-2 (or revision two) since the electrical layout is slightly different. This makes it so they're not compatible out of the box, so you can't just take a 8th of 9th gen Intel Core CPU and plug it in a Z170 or Z270 (or lower end chipsets from the same generation like H270, H170, H110, etc.) and have it work. In this experiment, I'll cover the mods needed and what resources are available to help "try" this. I say "try" because success isn't a guarantee and worst case you can brick your motherboard and fry your processor. I'll also be detailing what I'm doing, explaining the hardware I'll be using along with answering any questions anyone has along the way. I repeat, I have never done this, so basically you'll join me on this quest. Welcome to the party! Table of content 1 - Mod discussion - 2 - Mods needed and resources available - 3 - Board variations - 4 - My board, RAM and CPUs - 5 - BIOS modding progress - 6 - CPU Modding Progress - 7 - RAM details and overclocking - 8 - CPU-Z details - 9 - Conclusion -