
Welcome to ExtremeHW
Welcome to ExtremeHW, register to take part in our community, don't worry this is a simple FREE process that requires minimal information for you to signup.
Registered users can:
- Start new topics and reply to others.
- Show off your PC using our Rig Creator feature.
- Subscribe to topics and forums to get updates.
- Get your own profile page to customize.
- Send personal messages to other members.
- Take advantage of site exclusive features.
- Upgrade to Premium to unlock additional sites features.

Steven
-
Posts
42 -
Joined
-
Last visited
-
Days Won
4 -
Feedback
0%
Content Type
Forums
Store
Events
Gallery
Profiles
Videos
Marketplace
Tutorials
Everything posted by Steven
-
One of my favorite cases from that time, I know @Duality92 is doing a big mod right now in a Corsair 900D, those were my two favorite cases from that time.
-
We reviewed their RAM HERE in a higher rated kit. Let's see what their 3200 MHz 14-14-14 kit can do! Here's the kit in all it's glory. Performance wise, I pushed quite hard on this set, doing up to 1.8v with full 16GB in windows, I'll let the graph speak for itself, you'll easily conclude 20% performance gains overall. This chip/motherboard combo just doesn't seem to want to do over 3866 MHz, regardless of voltages, so with that into consideration, here are the results! First I put DRAM to 1.5V then SA to 1.3V and I/O to 1.3V, applied XMP with everything left on auto and started to raise the frequency. As soon as I increased to 3333 MHZ it automatically applied 16-16-16-39 timings and kept these up to 3866 MHz while tRFC was being adjusted with RAM frequency. I then started to reduce primary timings one by one and recording the results. Fastest read was 57167 MB/s with 3866 MHz 12-12-12-33-540 with really tight sub timings Fastest write was 56714 MB/s with 3866 MHz 12-12-12-33-540 with really tight sub timings as well. Fastest copy was 51199 MB/s with 3866 MHz 12-12-12-33-540 with slightly tight sub timings Best latency was an even 38 ns at 3866 MHz 12-12-12-33-540 with really tight sub timings Here's the SS for the fastest run, I use the ASRock software to be able to see the timings. I would like to thank Team Group for such a great product, I was able to push this kit so far and it didn't even bat an eye and the performance gains easily show off the quality of the product.
-
What's up everyone! Well today we're starting the EHW test bench sponsored log, it'll be a progressive log in which we'll keep everyone updated on how it's doing and what we're doing with it, if we're facing any issues, or if records are being broken. With that said, the first post will contain a sort of table of content and timeline of progress and will be continuously updated and improved upon. List of sponsors who have made this possible Team Group Cardea Zero Z340 512GB NVME SSD Team Group XTREEM ARGB 3200 MHz Cas 14 InWin : X-Frame 2.0 in green/black with 1065W PSU Hardware specifications of the test bench Intel i5 9600KF (modded to go on skylake/kabylake motherboards) ASUS Maximus VIII Formula (Modded to accept coffee lake CPUs by myself) ASUS GTX 780 (used in second full lenght x16 slot to leave first x16 slot for GPU testing and has all types of inputs) EKWB : GTX780 FC GPU block, Supremacy EVO CPU Block. EK-AF compression fittings, tubing Bitspower : Reservoir and D5 pump Alphacool : passthrough Thermaltake : 16mm PETG tubing and 16mm C-Pro fittings Table of Content 2020, October 23rd - RAM Overclocking featuring Team Group Xtreem ARGB
-
Old HWBot warhorses makeover - fixing bent pins and other past sins
Steven replied to J7SC_Orion's topic in Intel General
yeah it's a 8 core, 16 thread part and quite equivalent to a 9900K. -
hey bud!
-
Old HWBot warhorses makeover - fixing bent pins and other past sins
Steven replied to J7SC_Orion's topic in Intel General
stock 10700K for reference. -
some higher demanding titles that esports play for 144 fps @ 1440p would be good also, like PUBG and R6:Seige. Then I think of a bit lesser known games like Hunt:Showdown. Also Minecraft RTX is a must.
-
Old HWBot warhorses makeover - fixing bent pins and other past sins
Steven replied to J7SC_Orion's topic in Intel General
Oh and I settled on an i5 9600KF for now. edit : would tomorrow 8pm EST work for you? -
Old HWBot warhorses makeover - fixing bent pins and other past sins
Steven replied to J7SC_Orion's topic in Intel General
Get an E5 1680 V2 for it! That's what I got for my sabertooth x79! -
Old HWBot warhorses makeover - fixing bent pins and other past sins
Steven replied to J7SC_Orion's topic in Intel General
indeed I am! and yes, there's a seller on ebay that sells pre-cut stickers (thick kapton) and adhesive copper foil with conductive adhesive. (no need for conductive pens anymore!) -
Old HWBot warhorses makeover - fixing bent pins and other past sins
Steven replied to J7SC_Orion's topic in Intel General
I'll be doing my third motherboard soon, when I get everything in order, I'll be doing it live from start to finish. -
Old HWBot warhorses makeover - fixing bent pins and other past sins
Steven replied to J7SC_Orion's topic in Intel General
if you want any help just lmk, it's quite straight forward when you know what to do! -
Old HWBot warhorses makeover - fixing bent pins and other past sins
Steven replied to J7SC_Orion's topic in Intel General
You should mod that Gigabyte board for coffee lake! -
Old HWBot warhorses makeover - fixing bent pins and other past sins
Steven replied to J7SC_Orion's topic in Intel General
nice batch of motherboards there! I'm currently modding an ASUS VIII Maximus Formula for a 8700K for the EHW test bench, the high end ASUS motherboards are really no joke! After owning so many motherboards in the past 10 years from basically all brands, these high end ASUS boards are my favorites. -
that will def help, I'll be using a 16 core 32 core rig with like 16gb of RAM, 256GB NVME for the OS/VM and 1TB NVME for the cache drive!
-
I'm doing this combo for a friend too! Hope he enjoys it once it's done! Now, I choose to go the programmer way to program the BIOS chips directly instead of finding way around flashing non-official BIOS. This second attempt was more of a test to see how I could do ASUS Motherboards directly. Now, I received my "real" stickers from ebay along with copper conductive tape, so I'm fully equipped to do quite a few more now with relative ease. When I get everything, I hope to do a video on my next board, the ASUS Maximus VIII Formula!
-
I am not unfortunately, but I'm making a second mod right now with an ASUS Z170 Sabertooth Mark S. The last higher end white PCB ATX motherboard.
-
I'm actually going to set this up on my E5 2670, 32GB DDR3 server, which hosts nothing but a minecraft server atm!
-
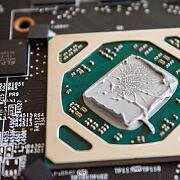
Looks like Noctua OEM to me. exactly the same mounting mechanism.
-
no problem!
-
It's theoretically the exact same process I did. When you're flashing you have the option to inject the microcodes for three or four different batches of CPU, just choose the 9900k instead of 8700k
-
Likely it would. I almost got one of those on ebay, but lost the auction last week. my next project board is an ASUS Maximus VIII Formula. If you're willing to try, get the CPU you want and I can walk you through it.
-
buddy of mine is pricard
-
Seriously! I had a MSI G41M board with a E5420 once upon a time, fun times, didn't even need to mod the BIOS!
-
Long overdue post! So, equiped with everything, I booted into the command line interface and launched in DOS the new modded 0.80 EFIFlash too, entered the flashing command line and voila, the force flash process started. This had to be the most stressful part of the whole thing. But, worth it, because I got that sought after "Success" message. At that point it was time to remove my flashing chip, the Celeron G3930 to make place for the beast i7 8700K. I was sort of stressed at this point because I didn't know if things really worked as there's no cookie cutter way to do this and no results page to show others results, but without a boot drive, I knew exactly that I'd go directly to BIOS is things worked as they should. The All-in-one program created by a user at Win-Raid does quite a few steps to mod the BIOS, there's a mod to change the maximum amount of thread from 8 to 16, a mod to add the microcodes for a select amount of processors, there's three total for three different batch of processors, there's also one to fix hyper threading, one to fix PCIE Express lane distribution to the slots and a few other coffee lake specific issues for running on 6th and 7th gen motherboards. So, back to the first booting, well, here was the results! I see Z170X and 8700K on the same page, YES! SUCCESS! At this point I was so happy everything was working, ram slots were working, so I wanted to start pushing this sytem. See what this 8700K was capable of! I put everything in the case PSU, Mobo+trimmings, GPU, two m.2 NVME SSDs with the watercooling. Started the watercooling planning, it was quite straight forward because my part layout and parts I had on hand. which included like 15 inches of EK ZMT tubing, chromed alphacool tubing and some 16mm PETG. I loved working with chromed tubing last time, so I decided to use as much as I could again, so three of the five tubing runs had chrome and the two last ones had ZMT, turned out quite well if I say so myself. Now, with everything up and running it was time to push this little CPU! I had to play with the lighting because I just couldn't do the RGB thing, so I decided on a theme that fit the motherboard colors. I pushed and pushed and pushed, climbed up to 5.3 GHz, just couldn't get it stable under CB R20 at a voltage that could keep temperatures under throttling limits with this monoblock and radiator solution. I although settled on 4*8GB of B-Die 3200/16 RAM with an overclock of 5.2 GHz. https://valid.x86.fr/ze5ur8 et voilà! Now that my CPU overclock is dialed down, it'll be the time to overclock RAM, which I'm hoping to achieve at least over what this motherboard is rated for, so above 3866 MHz. Now, stay tuned until the next post!