
Welcome to ExtremeHW
Welcome to ExtremeHW, register to take part in our community, don't worry this is a simple FREE process that requires minimal information for you to signup.
Registered users can:
- Start new topics and reply to others.
- Show off your PC using our Rig Creator feature.
- Subscribe to topics and forums to get updates.
- Get your own profile page to customize.
- Send personal messages to other members.
- Take advantage of site exclusive features.
- Upgrade to Premium to unlock additional sites features.
J7SC_Orion
-
Posts
2,211 -
Joined
-
Last visited
-
Days Won
96 -
Feedback
0%
Content Type
Forums
Store
Events
Gallery
Profiles
Videos
Marketplace
Tutorials
Everything posted by J7SC_Orion
-
I had a similar experience with MSI X399 re. Win 7 and Win 10 support. I use(d) two different MSI X399 mobos (one as backup)...the X399 Pro Carbon AC ran for a few weeks with my 2950X and dual Turing GPUs on Win 7 until my X399 Creation arrived...I then transferred both the Win 7 M.2 and added a new Win 10 M.2 to the X399 Creation, for dual-booting (that was the plan, at least...). The Win 7 M.2 will boot fine on the X399 Creation, even with full GPU support, however, no USB. I know there is a workaround, but weirdly, on MSI's site, the X399 Pro Carbon AC offers official support drivers for both Win 7 and Win 10 while the X399 Creation only lists Win 10...
-
Old HWBot warhorses makeover - fixing bent pins and other past sins
J7SC_Orion replied to J7SC_Orion's topic in Intel General
...using the long weekend here to rewire and expand the CAT7 based network in my home office to accommodate the 'new old - old new' HWbot machines referenced in this thread. That includes the additional update (Z170 SOC Force / 6700K ES) linked in the post directly above. In turn, it freed up two nice non-RGB 120mm fans to 'fix' the look (@486 ) on the RvE / 5960X revitalized setup - which is now the daily driver / beast of burden for lower-rez (1080p) and sits right next to me...was hard to ignore the previous RGB 'show & clash' Before... After... -
Very nice write-up ! I had a chance to see Elmor's I2C in action before, and this 'ElmorLabs AMPLE' is a nice addition, for example for GPUs per your post... ...which reminds me: @486 ...keep this in mind re. 780 Ti Classy with 'those scars'...
-
GAME: Ban the Above User for a Reason - EHW Edition
J7SC_Orion replied to Simmons's topic in Chit Chat General
...and your not pleasantly surprised ! ban -
AIO pit stop and rebuild...its first in 8 years
J7SC_Orion replied to J7SC_Orion's topic in Water Coolers
...most of the AIOs back then had Asetek blocks / pumps which were similar if not the same. As to where to buy the cooling liquid, I stocked up about 10 months ago and bought several at Amazon since I also use it for custom loops. They also go by a newer name (includes 'Pacific'), but per link, Amazon seems to be out of stock now as well :-( ...However, I figure other good quality liquids with stated anti-corrosion use for mixed metals probably will work just as well. ...re. temp drop, yes and no...up until I fooled around with the rad position, it really hadn't deteriorated at all. The rad had been mounted 'sideways' for years and I think all those deposits had built up internally just at the lower edge, and not really impeding flow very much, until that fateful day retro fever started... Temps now are at least 3 C - 4 C better in terms of delta to ambient, but that could also be because of replacing the pretty good stock TT fans with great Noctuas, which are also much quieter at full load. In addition, I just added a 140mm Coolermaster fan above the primary GPU but it is close enough to the CPU pump / block, VRM and rad to have a bit of an impact as well. -
AIO pit stop and rebuild...its first in 8 years
J7SC_Orion replied to J7SC_Orion's topic in Water Coolers
Tx ! Yeah, this was more of a fun exercise, but so far at least, it seems to work great and it really didn't cost me anything other than my time....only problem: a surplus now of really good elastics for dual fan air-coolers. May be I list them on the EHW marketplace... -
...components can add weight up quickly ! I have one HEDT workstation_+_fun build that weighs over 90 pounds (a lot of w-cooling equipment with redundancy, dual w-blocked GPUs, some copper tubing, and a seriously heavy PSU...). It keeps temps low though no matter what ...then again, so does a little refurbished AIO retro system I just finished that weighs just over 28 pds... the first has w-cooling to deal with 1170W heat dispersion, the second only around 160W. @Laithan - impressive build - though you finally may be out of room inside that case
-
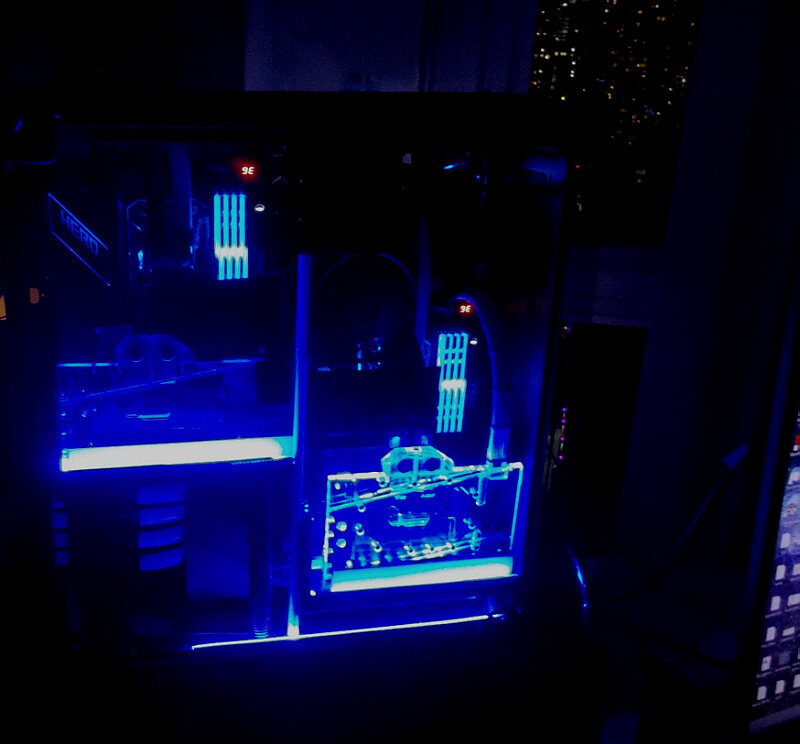
Almost at the finish line, very nice presentation ! btw, how close will you be sitting to this system (...wondering about the Delta fans as I have 'experience' with them) ?
-
GAME: Ban the Above User for a Reason - EHW Edition
J7SC_Orion replied to Simmons's topic in Chit Chat General
banned coz...letting old things go can lead to regret later ! -
AIO pit stop and rebuild...its first in 8 years
J7SC_Orion replied to J7SC_Orion's topic in Water Coolers
Thanks ! Yeah, the retro bug has been bad this month As to your question, no, I didn't remove the tubes (thought about it though). I refilled it through the block which btw itself holds just a bit of liquid...that bottle nozzle that comes with the TT Coolant 1000 is perfect for this - per pic below, it fits nicely in the upper right (outlet) opening. -
Old HWBot warhorses makeover - fixing bent pins and other past sins
J7SC_Orion replied to J7SC_Orion's topic in Intel General
FYI, another 'retro & maintenance' build posted > here... -
Let's start with some context: Back in the late fall of 2012, I picked up a 3770K and an Asus Maximus V Extreme...the CPU turned out to easily hit 5 GHz at just over 1.3v, but in order to make it last, I wanted to drop temps a bit...and so my first foray into 'water-cooling' got underway. These days, I prefer custom loops (my latest 'new' build has 1800/55 rad space & dual loops) but back then, I started with a Thermaltake 240mm AIO... After the 3770K, this AIO unit moved onto a 4790K and then a 6700K ES... Over almost eight years, that little AIO never gave me any trouble, perhaps because it was mostly running 24/7/365 instead of cycling...with periodic cleaning, temps remained steady. Things changed though during a recent bout of (Covid-induced ?) retro builds, some of which are also on EHW. Long story short, I turned the AIO unit off, moved the rad around for improved cable management, and did some extra cleaning -- but when I turned it back on, temps were about 40c higher than before ...Also, the pump was still running at its 3k+ rpm setting, but it didn't sound so good, so I turned it off quickly. After 8 years you might say it was time to get rid of that AIO, but since it had given me such good service, I decided to try to fix it - plus, the retro bug was still raging. As usual, if you want to do something similar, you do so at your own risk While I have built and torn down a lot of different custom loops, I had never tried to fix an AIO (apart from this unit, I only have one other AIO from September, 2018). There are some questions, for example about the cooling liquid type and exact amount for the refill. I am only doing '(semi-) educated guessing' at the answers...that said, I have thoroughly stress-tested the unit for a few days, which incidentally are the hottest of the year here. --- First, it was time for disassembly...lots and lots of little screws to contend with... Next, on to draining...the pump impeller looked pretty good, btw, though not the (smelly) liquid, with lots of particles and 'crumbs' at the bottom of the jar... ...yes, that jar was dishwasher-clean before this operation ...one side of the copper cold-plate / fin array looked pretty good... ...but not the other ! ...sorry for the auto-(not so-)-focus pic: ...the green tape marked the liquid level for later steps... It seems that when I moved the rad and rubber tubes for maintenance and improved cable management, all kind of 'stuff' dislodged and plugged up sensitive passages. I certainly don't think it's a quality issue, on the contrary...I am amazed that this AIO performed as well as it did for 8 years... But now, time to clean things.... A good 20 minutes of repeated flushing with tap water in the bathtub (checking for additional particles on the bathtub floor after each flush). After two further 'particle free' flushes, I followed that up with a thorough flushing with distilled water of all the parts (block, rad, copper fins...) Per jar marked with the green tape, I had a rough idea how much liquid I needed at a minimum for a refill. Of course I don't really know how much might have evaporated over the years...but I completely filled the now clean unit with Thermaltake's Coolant 1000, then let a few cc's out to compensate for expansion / contraction during operations. I chose Thermaltake's Coolant 1000 because I have been using it for many years in my custom loop builds and have very good experience with it. Also, it is "...non-toxic and non-flammable, the Coolant 1000 is an eco-friendly pre-mix solution with 2 years shelf life, providing great performance while preventing the entire cooling system – copper, brass, nickel, aluminum, and steel – from corrosion. In addition, users can easily refill by using the refill bottle." Mixed-metal water-cooling (such as copper and aluminum in the AIO discussed here) is always tricky re. corrosion. This liquid and its anti-corrosion properties should work ok, but I will certainly keep an eye on the pump speed, noise and overall temps for any indication of potential problems. Time to do some thorough (24 hrs) leak testing: Before installing the reassembled AIO, a few beauty mods for the rest of the system. It is based on the 6700K 'ES' in a Gigabyte Z170 SOC Force mobo...a fantastic board which I have frozen before (LN2), then air-cooled, then water-cooled....it never missed a beat in over 5 years of sometimes rough treatment, and even now, it is still thoroughly modern with 3x M.2s slots onboard, USB-C etc. Then there's that massive VRM (22 phases, all told). But I could never quite get used to its orange colour scheme (and various 'labels / messages' on it). I don't mind the calming orange LED back-lighting, but I wanted to mod the look a bit to match my 'Orca workstation' build (also on EHW)....so I tried to introduce black, white and silver / grey. There was also the TridentZ (DDR4000 setting ) which had very red inlays... I also painted the AIO block cap white (only to get thermal grease finger prints on it later ), modified the retaining mechanism (metal bracket instead of plastic on the back of the mobo) and changed the two 120mm fans over to some Noctuas I had available...there's really nothing wrong with the Thermaltake fans that came with the AIO unit, but the Noctuas are a bit quieter while also dropping temps by another 2+ C or so. As mentioned in another EHW thread, I am planning to install a 9900KS in this setup later after the relevant Z170 mods, and while I may end up going for a custom loop then and switch this modded AIO over to another 4-core setup in my home-office, these AIO mods are worth it one way or the other. I threw in a pair of 780 Ti Classifieds and mounted the whole thing in an unusual, ahem, test-bench 'Bauhaus frame'. There is still some more de-oranging work to do, but I really like the outcome so far (if I do say so myself)... Another view of it...the system in the back on the left is the aforementioned Orca workstation setup with design parameters I was trying to approach with this build and related mods...I think I am going to call the Z170 system 'Porpoise' The AIO and system update in 'Porpoise' have been running for a few days continuously, including lots of stress tests. I dialed the CPU back to 4.7 GHz for now (with a bit of extra voltage to generate a bit more heat), but when I am satisfied that everything is as it should be, I'll bring it back to 4.8 (lower right), it's setting prior to this 8-year 'pit-stop'...
-
GAME: Ban the Above User for a Reason - EHW Edition
J7SC_Orion replied to Simmons's topic in Chit Chat General
...okay, then, moving right along...banned coz: -
...MSI has put out some vids for X399 and X299 w/ the Aero Xpander card for RAID and boot setup. However, most of the steps take place in the motherboard bios and I don't know if yet the X79-E WS win-raid modded bios carries NVME through to the relevant option fields...it should, though. Also, I found this <>link ...great extra pics above !
-
Very nice build-up layout (& motherboard )! ...I am looking forward to the rest of the build-log. Per other threads @ EHW, I plan to try out that win-raid modded bios you had linked for the X79-E WS (NVME; bifurcation) and then see if the MSI Aero card below works. It's PCIe 3, but afaik, PCIe 4 M.2s drives should work, just at PCIe 3 speeds (thinking about future upgrades for these drives into a PCIe 4 environment) ?
-
Old HWBot warhorses makeover - fixing bent pins and other past sins
J7SC_Orion replied to J7SC_Orion's topic in Intel General
...just don't ship them via the postal service and you'll be fine ...but seriously, I won't buy EVGA anymore ...their design and software is second to none, but repeated PCB quality issues -
Old HWBot warhorses makeover - fixing bent pins and other past sins
J7SC_Orion replied to J7SC_Orion's topic in Intel General
Thanks. I also just saw @Laithan 's link above for the X79-E WS win-raid updated bios for NVME & bifurcation ...now I can plug in that 4x M.2 MSI Xpander Aero card that came with the X399 Creation and see what's what. Whether Plex, NAS or (2nd) retro gamer with EVGA Classies, this combo offers a lot of versatility. -
Old HWBot warhorses makeover - fixing bent pins and other past sins
J7SC_Orion replied to J7SC_Orion's topic in Intel General
...Finish Line ! ...Now I'm all retro'd out for a while... I built up and thoroughly tested the Asus X79-E WS with a unique 4960X ES...it's very low voltage and at 4.7+ GHz, Cinebench R20 only peaks at 103W, according to HWInfo - way less than half of what the 5960X wattoholic slurps down at 4.5 GHz (mind you, with two more cores and four more threads). The whole thing sits in the aforementioned CM Stryker ('hardly used, like new old stock') Also, like the 5960X, using Strap 125 instead of Strap 100 makes a big difference <> almost 30k MB more memory writes / second, as well as lower vCore requirement for a given speed. For cooling, I normally do custom loops, but the H150i Pro 360mm AIO we had laying around is doing quite well and just fit @ the front of the CM Stryker case w/o dremel mods. This setup will be part 1080P retro-gamer, part NAS - the X79-E WS is great for both. -
Old HWBot warhorses makeover - fixing bent pins and other past sins
J7SC_Orion replied to J7SC_Orion's topic in Intel General
...yeah, I kind of lucked out on that. It's like new and was only used for a short time as we bought and used several Anetc 302s as they're smaller (now Dremel-modded with side air inlet per above), but the CM Stryker goes into a different location at my home-office anyway. -
...I want my MTV quad NVLink / Quadfire next-gen mGPUs !!
-
Old HWBot warhorses makeover - fixing bent pins and other past sins
J7SC_Orion replied to J7SC_Orion's topic in Intel General
...for the Z170 stream @ EHW ? I am on Pacific NW time and tomorrow won't work for me re. prior appointments. Thursday or Friday at that time could work, but I do not want to be the reason you have to delay. Would EHW not have a YouTube of it ? -
Old HWBot warhorses makeover - fixing bent pins and other past sins
J7SC_Orion replied to J7SC_Orion's topic in Intel General
^^sounds good re. pre-cut / thick kapton and your upcoming Z170 > 9900K stream ! ...I finished the clean-up and build-up of the formerly broken Asus Rampage V Extreme 'ex sub-zero', per above. If you look closely, there's still some insulation grease left around the socket, but it won't hurt anything, and trying to get that off all the little caps is a bit too risky...even with a soft-bristle toothbrush... The back of the mobo also still has some LET (Liquid Electrical Tape) on it, but it can stay there - no harm, no foul.. I dropped in a 5960X, 'lapped it to the max'... ...seems to have worked well enough, judging by the temps (Cinebench R20 'max'). This CPU is not the best clocker but has a decent memory controller, running 32GB CR1 DDR4 / 3333 MHz @ 1.35v....it's all nice and crisp now with SSDs. However this older gen of Haswell-E HEDT is a bit of a 'wattoholic' - its 8c/16t use 249W for a Cinebench R20 run, while my 2950X 16c/32t uses 279W for 205% of the score. Still, I couldn't be happier that the Rampage V Extreme / 5960X is out of storage with all memory channels working and now running just fine for daily use... I am still going to have to do something about those RGB, but functionally, it's now were I like it... I also cleaned up an old PS2 keyboard used for sub-zero, not to mention the recipient of a few coffee spills...WD40 (first regular, then gel as the final) baths always work for me. If you look closely, those whitish spots on the bottom of the keyboard will be a permanent reminder of my follies - those spots were caused by acetone for DICE... The Rampage V Extreme has now replaced the 4960X / Asus X79-E WS combo (including PSU, case, GPUs and custom loop setup). The Asus X79-E WS is one of my fav old war horses and I dug up an older white Stryker case (still has protective foil on the window ) and a little-used AIO...new frontiers await that setup... -
...waiting to see what big Navi / RDNA2 brings to the table is probably not a bad move, if only to confirm preference for Ampere (or not). I used to get first-batch of next gen cards but these days, I don't mind waiting a bit. Dual custom high-clock 2080 Tis are still plenty for now. Re. 12pin, I hope NVidia is not trying to be different just for the sake of artificial product differentiation (Apple anyone?). There are quite a few 3x 8 pin GPUs (525W w/ PCIe 'spec', never mind actual) out there already, along with relevant PSU cable options for that in the box...
-
GAME: Ban the Above User for a Reason - EHW Edition
J7SC_Orion replied to Simmons's topic in Chit Chat General
...but do you know the secret handshake ? ban -
According to TechPowerUp "On topic of the connector's proliferation, in addition to PSU manufacturers launching new generations of products with 12-pin connectors, most prominent manufacturers are expected to release aftermarket modular cables that can plug in to their existing PSUs. Graphics card vendors will include ketchup-and-mustard adapters that convert 2x 8-pin to 1x 12-pin; while most case/power manufacturers will release fancy aftermarket adapters with better aesthetics" source Also: